Day 1: What websites are made of
As to methods, there may be a million and then some, but principles are few. The man who grasps principles can successfully select his own methods. The man who tries methods, ignoring principles, is sure to have trouble.
I don’t have to tell you that the ability to build websites is an incredibly empowering skill. The idea of building things — especially things of your own design — that could potentially reach millions of people is an exhilarating one. When you get started with building your first website, it’s easy to get overwhelmed by all the information out there. Before you get caught in tutorial paralysis, let us get one thing straight: you don’t have to be a genius to build websites! What you do need, is to be determined. In the end, it’s all just a matter of breaking down problems into smaller problems, and then solving them one by one. So for this series, the problem we’ll solve is: how can we, without any prior knowledge in web development, build this website in 3 days time. We'll break this problem down into: getting acquainted with the languages that make up any website (day 1), laying down the structure and style for our website (day 2), and finally, adding interaction behavior and publishing it for the world to admire (day 3). When you’ve finished this series, you’re going to look like you have magical powers compared to everyone else. So let’s get started…
Browsers talk HTML
When you visit a website, basically what happens is that your browser fetches an HTML file from a server and renders the information in this file for your eyes to see. Which HTML file gets fetched from which server depends on the url you’ve entered in your browser’s address bar. Thus, the first step to building a website is creating such an HTML file;
Open your text editor (notepad on Windows, textEdit on Mac), type Hello world. This is my first website and save it as "index.html" (in textEdit, select the Format menu before saving and choose "Make Plain Text”). Be sure to save it in the web page file format, which means it should have a .html extension and not the default .txt extension. Now, using your favorite browser (Internet Explorer, Safari, Chrome, Firefox…), choose "Open file" from the File menu and navigate to your "index.html" file. Select it and click Open, or even easier, just drag the "index.html" file in your browser window. Your browser should now say "Hello world. This is my first website". Congratulations, you’ve created your first website!
You might not realize it yet, but you’ve just written some HTML (HyperText Markup Language). HTML is a human readable language that tells the browser all about the content and structure of the web page. In the website you’ve just built, "Hello world. This is my first website" is the content of the web page. Now, with the help of some HTML tags, let’s give the browser some cues about the structure and meaning of this content.
In your "index.html", surround your existing text with HTML tags, like so: <h1>Hello World</h1><p>This is my first website</p>.
Be sure to get the specific HTML tag syntax correct! The closing HTML tags have an additional forward slash in them.
Now save your HTML file, refresh your browser and observe the transformation of the text in the browser.
As you can see, the HTML tags themselves are not visible in the browser. They are only present in your HTML file to give the browser cues on the meaning of the content inside these tags. In our example, the h1 and p tag tell the browser that "Hello world" and "This is my first website" are to be treated as a header and a paragraph, respectively. Besides h1 and p, many other HTML tags are available to describe the structure of a web page semantically. For most of these tags, browsers have built-in default rules on how to display their content. In our example, the header text is displayed bigger and bolder than regular text, a line break is enforced, and both the header and paragraph have been given top and bottom margins. However, you don’t have to settle for these default rules! You can enforce your own style and formatting rules with another human readable language called CSS.
Ok, so what we have so far is an html file with some markup. Does that make it a valid web page? Not quite. Before we’re going to add style to our page, let’s get the proper HTML template in place that is used for any professional web page.
Replace the content in your current "index.html" file with the following:
Note that we’re nesting HTML tags here, e.g. the title tag is nested within the head tag. We’re also using line-breaks and indentation to clean up our code, which is a crucial thing to do if you want to avoid spending hours on finding for example a missing closing HTML tag. This formatting of your code will not be reflected in your web page. Line-breaks and indentations can only be enforced by HTML tags and their corresponding CSS rules.
After saving your HTML file and refreshing your browser (this is the last time I’ll tell you to save your HTML file and refresh your browser. You should do this with every update in your HTML file), you’ll notice that not a lot has changed in your web page. What are these extra tags for then? Let’s look at them one by one:
-
<!DOCTYPE html>
The <!DOCTYPE> declaration must be the very first thing in your HTML document. It is an instruction to the web browser about what version of HTML the page is written in. We’re using the most simplified <!DOCTYPE> declaration here, which coincidentally is the most correct one too, according to the latest HTML specification (HTML5). Who said building websites should be complicated? -
<html></html>
This tells the browser the content of the file is HTML. All your HTML must be surrounded by this tag. Its only direct children are the head and body tags. -
<head></head>
The head contains information about your web page, like its title. Later on, this will also be the place where we’ll give the browser instructions on where to find the CSS that styles our web page. -
<title></title>
Unsurprisingly, the title tag contains the title of your web page. It usually appears at the top of your browser window. It’s also important information for search engines like google. -
<body></body>
The body contains all the content and structure of your web page —the parts of the web page that you see in the browser.
Adding style
Now that we have this formal stuff out of the way, it’s time to tell the browser where to find the CSS (Cascading StyleSheet) that styles our web page. The logical place to add this information is in the head tag, and that’s exactly where we’ll put it.
Note that the link tag has no closing tag. It’s what we call a self-enclosing HTML tag. There’s no reason for it to have a closing tag since there’s no content to be contained. Like any HTML tag though (more on this later), the link tag can contain information about itself in its attributes. Our link tag uses the attributes href and rel to explain to the browser that it should fetch a file named style.css and use it as the stylesheet for our web page. Let’s create that CSS file:
In your text editor, create a new file, type h1{color:red;} and save it as "style.css" (in textEdit again, select the Format menu before saving and choose "Make Plain Text”) in the same directory as your "index.html" file. Be sure to save it in stylesheet format, which means it should have a .css extension and not the default .txt extension. Now, refresh your browser. The header "Hello world" has a red color now.
It’s quite possible that the header in your browser doesn’t have a red color yet. It’s possible that creating your "index.html" and getting it to display as a web page in your browser wasn’t smooth sailing either. If so, than I respect you for still hanging in there. And let me seize this opportunity to share with you this brutal truth: the beginning stages of becoming a web developer can really suck sometimes. You’ll feel overwhelmed, you’ll feel like throwing your computer out of the window, and you’ll feel like there’s no way you’re ever going to learn this shit and be good enough. My advice would be to keep your cool and approach these obstacles as opportunities to learn. These are the moments when the wheat gets separated from the chaff, and it’s for you to decide where you stand. It also helps to know there’s a huge developer community out there that faced similar problems, and were kind enough to share their solutions on a multitude of blogs, forums, Q&A sites, … across the internet. So whenever you run out of ideas for solving a problem, just google it! To get back to our my-header-isn’t-red problem, here are some possible solutions:
-
Double check special characters in your HTML and CSS files. E.g. in
h1{color:red;}Are you using colons and semicolons correctly? - Did you save the updates in your HTML and CSS files? Did you refresh your browser?
- Double check the value of the href attribute in your link tag. Does it match your css file name?
- Check the location of your CSS file on your computer. It should be located in the same directory as your "index.html" file.
- textEdit users on Mac: in the Edit menu of your "index.html" file, select "Substitutions", uncheck "Smart Quotes" and rewrite your double quotation marks around your attribute values (I had to google this problem myself).
- etc…
Back on track? Ok then, let’s take a closer look at what we’ve got so far. Firstly, when a browser opens our HTML file, it processes it from top to bottom. It encounters a link tag which references our CSS file as the stylesheet for our web page. The browser retrieves this CSS file and processes it, saving all the CSS rules within it. The browser then processes the rest of our HTML file, applying its CSS rules to the respective HTML tags. Looking at our CSS rule h1{color:red;}, its meaning is quite self-explanatory. In order for the browser to understand it, though, the syntax has to be one hundred percent correct. Luckily for us, it’s always the same pattern: CSS selector (in our case h1) followed by curly braces that contain one or more CSS declarations (in our case color:red;). Each CSS declaration includes a CSS property (in our case color) and a corresponding value (in our case red), separated by a colon. All CSS declarations end with a semicolon. Easy as pie…
Needless to say, there’s a huge amount of CSS properties available for styling our web page. We could go through the list, but that would be pointless. Instead, we’ll conjure them up as needed while building our website. For now, let’s focus on CSS selectors.
As it stands now, if we’d have multiple h1 headers in our web page, they would all be colored red. Now suppose we want only a specific type of header colored red, namely the headers marked as "highlighted". Seems like a reasonable requirement, right? Are we supposed to invent a new HTML tag for highlighted h1 headers now? No way, man! That would lead us to an html tag soup we can’t possibly expect the browser to make sense of. Instead, we’ll decorate HTML tags with attributes, and target these attributes using specific CSS selectors. The attribute predominantly used as a hook for CSS selectors is the class attribute. Let’s look at an example:
In your "index.html" file, add a class to the current h1 header like so: <h1 class=“highlighted”>Hello world</h1>. In your "style.css" file, target this header by replacing the current CSS rule with .highlighted {color: red;}.
Note the dot before the class name in our new CSS rule? That’s special CSS syntax reserved for targeting elements (from now on we’ll refer to HTML tags with their content as "elements”) with the respective class attribute. In other words, our CSS selector is now targeting all elements with a class name "highlighted". If you’d add this class to our paragraph element, it would be red as well. Give it a try! Isn’t it wonderful… Note that although the choice of class name is entirely up to you, it’s highly recommended to keep them semantically correct.
Now what if we added a second rule to our CSS file h1{color:brown;}? Will our header color brown or red? Indeed, we now have two categories of CSS selectors (type selector vs. class selector) in our CSS file, both targeting our h1 header. And by the way, are there any other categories of CSS selectors I should know of? Yes sir, there are! And you’d probably like to know that you can combine multiple CSS selectors too, like for instance h1.highlighted{} targeting only h1 headers with a class highlighted. And you should also know that… Hold it right there! This is neither the time nor place to learn about complex CSS selector patterns. Keeping our CSS code simple is not only convenient for us at this point, it’s also best practice. Let’s focus on what we need to build our website, and what we need is a notion of the concept CSS specificity. Here’s a definition:
CSS specificity is the means by which a browser decides which CSS property values are the most relevant to an element and therefore will be applied. CSS specificity is based on the matching rules which are composed of CSS selectors of different sorts.
In other words, if we have multiple CSS selectors targeting the same element, the most specific CSS selector pattern will determine the value of their shared CSS properties. The question that follows naturally is: what makes one CSS selector more specific than another? Well, there’s an elaborate set of rules for determining a selector’s specificity… which we’re going to ignore completely. For now, we’re going to adhere to one principle only, which is: use your common sense. I hope we can agree that this principle implies that class selectors are more specific than tag selectors, and that selector specificity increases with its complexity (e.g. h1.highlighted is a more complex selector than .highlighted, and thus is more specific). If we’d have multiple selectors with equal specificity, the selector closest to the bottom of our CSS file wins. Let’s keep in mind that if you have a CSS rule targeting a certain element, but its style properties aren’t applied as expected, CSS specificity is probably the cause.
Let’s look at some examples of CSS selectors, ordered by increasing specificity. Grasping these will suffice for now.
-
Tag selector
example:h1{}
Targets h1 elements -
Class selector
example:.highlighted{}
Targets elements with a class name "highlighted” -
Multiple selectors separated by a space
example:body .highlighted {}
Targets elements with a class name "highlighted", nested within the body tag -
Multiple selectors without a space between them
example:.highlighted.active {}
Targets elements that have both a "highlighted" and an "active" class. Yep, HTML tags can have multiple classes, like so:<h1 class=“highlighted active”>Hello world</h1> -
Pseudo-class selector
example:.highlighted:hover {}
Targets elements with a class name "highlighted" that the user mouses over
Now don’t get me wrong. If you want people to take you seriously as a web developer, you’d better understand CSS specificity. Complex websites lead to complex CSS selectors, which in turn lead to hair loss if you don’t master CSS specificity. The website we’re going to build however is quite simple, enabling us to write simple CSS code and thus avoiding complex CSS selectors.
Et voila, that’s all you need to know about CSS for now. I agree that the styles we’ve applied to our header and paragraph so far have been all but spectacular, so let’s conclude this section by showing off what CSS is really capable of:
Replace the current CSS rules in our CSS file with the following;
Lo and behold, this little piece of self-explanatory CSS code has transformed our website into a true work of art! Don’t worry if you don’t grasp all the details yet, but worth noting is the proper use of indentation and grouping of related CSS properties for better readability. Also note that elements can inherit some CSS properties from their parent elements, illustrated here by the font-family and text-align properties in our h1 and p elements.
Adding behavior
With HTML and CSS under your belt, you have everything at hand to build stunningly beautiful websites. If that suits your needs, well then you can go right ahead and skip this section. If you want your websites to come alive, however, you’re going to have to get acquainted with JavaScript. Where HTML and CSS are markup languages, JavaScript is a programming language, which is another ballgame entirely. In our website, we’re going to harness the power of Javascript to implement tab functionality and for prompting our bootstrap modal when the "Show me some magic" button is clicked.
The purpose of this series in respect to JavaScript is not to teach you the ins and outs of this programming language, but rather to give you a feel for how JavaScript can add behavior to websites. This by itself will enable you to do add a multitude of functionalities to your website. How’s that, you ask? By incorporating ready-made code snippets from other developers into your website, I answer. No need to reinvent the wheel, right? If you’d like to eat a pie, you can either make one yourself or you can get it in a bakery. We’re gonna get our pie in a bakery. If you want to make your own pie, I’d suggest you open up a book on the subject.
One thing you need to understand is that, since we’re writing JavaScript that is to be executed in a browser environment, we are able to interact with objects provided to us by this browser. Interaction with these 'host objects' enables us to control the behavior of our browser. Let’s create a JavaScript file that will prompt our browser to display a popup message box:
In your text editor, create a new file, type window.alert(‘Hello, I’m a popup’); and save it as "script.js" in the same directory as your "index.html" file. Be sure to save it in JavaScript format, which means it should have a .js extension instead of the default .txt extension. Now, instruct the browser to fetch this file by adding a script tag in the head of your "index.html" like so:
Note that although no content is enclosed by the script tag, you should not omit the closing tag here. Let’s just accept this nuance of HTML grammar with the stoicism of a cow standing in the rain.
Now refresh your browser. A popup is prompted by the browser on pageload.
The main host object that’s provided to us by the browser is the window object. In our example, we’re invoking the alert() method on it, thereby sending the message "Hello, I’m a popup" to the browser internals, which handle it by drawing and displaying the message box. Now unless you’re out to create an unfortunate game of whack-a-mole, we’d better dig deeper into the window object.
The most commonly used property of the window object is the document object, which serves as an entry point into the web page's content, namely the Document Object Model (DOM) tree. The DOM tree for your current website should look familiar:
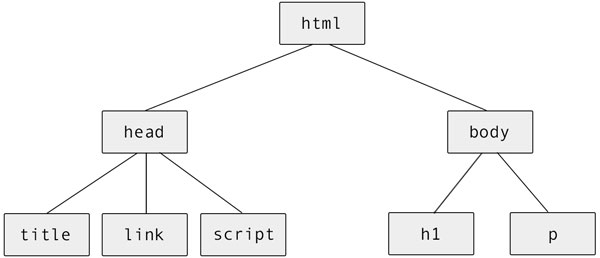
This DOM tree is created by the browser upon pageload, and is based on the HTML file we provided. Via the window.document object, we can now iterate over this DOM tree, access and manipulate our existing HTML elements, and even create or delete HTML elements on the fly. An important gotcha we have to take into account is that the browser is only able to construct the DOM after it has processed our HTML file in its entirety. Execution of our JavaScript file can thus start before DOM availability, resulting in errors when it’s trying to interact with our as of yet inexistent DOM. Luckily for us, the browser keeps us in the know on the myriad of events occurring, one of which is DOM content loading. DOM manipulating code should be wrapped in a function that’s executed only when this ‘DOMContentLoaded’ event is triggered. Let’s illustrate this:
Copy the following piece of code in our "script.js" file;
Read through this code line by line. Can you figure what will happen to your website when you refresh your browser? In the first three lines of code, we are creating a brand new paragraph element. Since this is not dependent on our DOM tree, we don’t have to wait for the 'DOMContentLoaded' event to execute this code. Once the DOM is loaded, we’re selecting the body element from it, and appending our new paragraph element to it. As a result, you’ll see a new paragraph added to the bottom of your website. This paragraph element was not declared statically in your HTML file, but added dynamically from your JavaScript file. Not impressed? Then imagine what you can achieve by tapping into click events to toggle classes (and thus CSS styling) on HTML elements. Coincidentally, that’s the approach we’ll use to implement tab functionality for the website we’re building in the coming days.
The right tools for the job
If you don’t use the right tools for the job, you're apt to find something you didn't expect and get discouraged. So far, we’ve been using our default text editor (notepad on Windows, textEdit on Mac) to code our websites. Text editors like these are great for building your very first "Hello world" website, as it drives home the point that virtually anyone is able to build websites. However, they are very basic in their functionality. If you’re writing a body of formatted text, you’re not likely to use this simple editor, but rather a specialized editor like Microsoft Word or Google Docs. Likewise, you should use a specialized editor for building websites. Examples of such editors are Coda, TextMate, Vim… I use Sublime Text, which I hereby recommend. Get it now! The benefits will be self evident immediately.
Another indispensable set of tools for any web developer is most likely already built in in your browser, though some browsers require more action than others to open them. In most browsers, right clicking on a website and selecting "inspect element" will do. If this is not an option for you, I suggest googling for instructions on how to open these developer tools in your specific browser. Browser developer tools enable you to take a look at your code from a browser’s perspective, which evidently can be very helpful when testing and debugging your code. There’s an enormous amount of functionality in these tools, aimed specifically at facilitating the process of building websites. I’ll leave you to discover them for yourself.